
Setup GuideLast updated: 2026-01-25
SmartBackup accesses your organization's Smartsheet data via a Smartsheet sysadmin API Token when running both Business Edition and Enterprise Edition. The sysadmin Token can be used to run SmartBackup functions on behalf of all users in your Smartsheet environment.
When running Business Edition, you will need to provide AcuWorkflow with a list of up to five (5) Smartsheet Member users, as Business Edition is designed for small team use. When running Enterprise Edition, all Smartsheet Members are included in SmartBackup jobs by default, unless specifically disabled by a SmartBackup Admin.
Process
A typical SmartBackup initial setup will include the following steps:
Business Edition
- Start the SmartBackup application [or Console.exe] (3 minutes)
- Obtain a Smartsheet sysadmin Token (3 minutes to a few days depending on the availability of your organization's Smartsheet Systems Administrator)
- In the SmartBackup Console, click on "Settings" and expand the "1. General" section. Then use the dropdown to select the appropriate Region for your Smartsheet environment. The options are US (for North America), EU (for European Union), or APJ (for Australia). [Note: contact AcuWorkflow Support if your Smartsheet account uses the GOV region]. IMPORTANT: Remember to click the "SAVE THE SETTINGS" button before moving on to the next step.
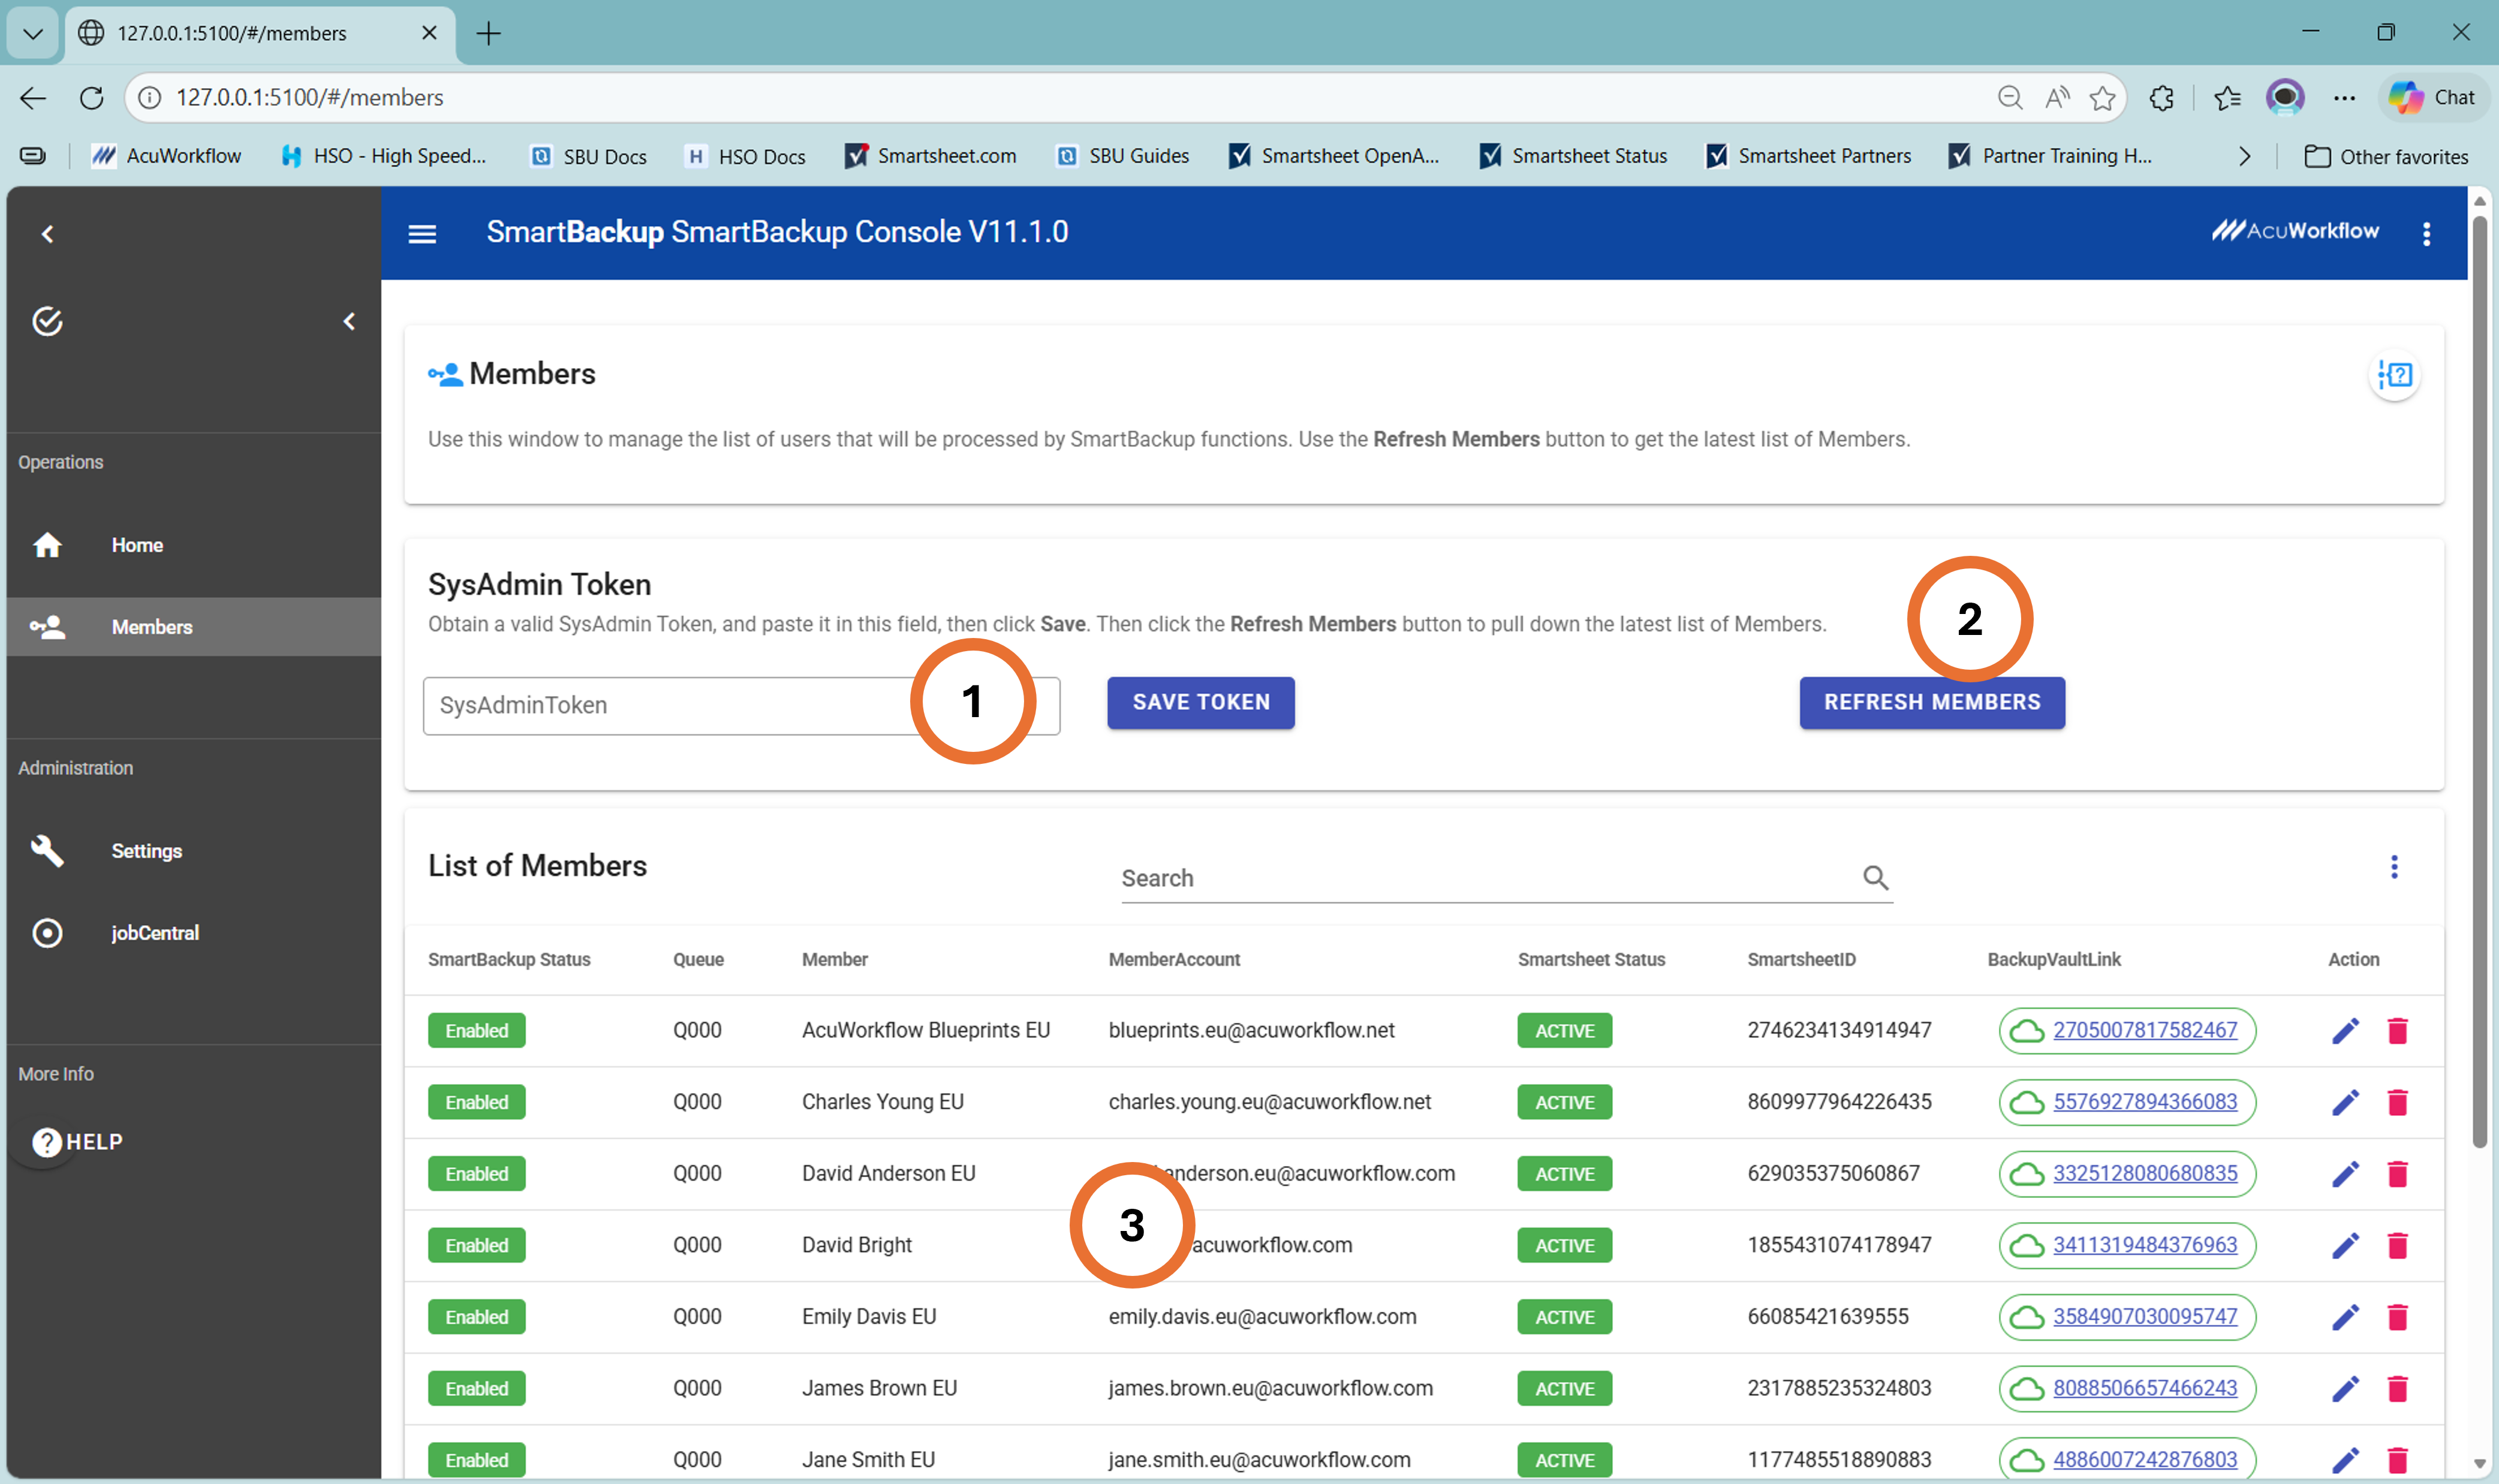
- Open the "Members" panel, enter the sysAdmin Token and click "Save" (0.5 minute)
- Click the "Refresh Now" button to obtain the latest list of all users (2-3 minutes)
- Wait for the green confirmation message in the top right corner of the window, then select "Actions" and "Mark all DISABLED" (1-2 minutes) [Business Edition Only]
- Review the Member list and use the Edit button to set a maximum of five Users to "Enabled" [this must be the same list of users that you provided to AcuWorkflow when onboarding] (3-5 minutes) [Business Edition Only].
- Go to "Settings" then click to expand the "2. LiveCopy" section and click on the green "CREATE USER BACKUP VAULTS" button. Wait for the confirmation message (3-5 minutes)
- Review the run time options and click "Save the Settings" to save all changes (10 minutes)
- Refer to the JobCentral Setup section to setup and configure JobCentral as your single source of truth for all SmartBackup notifications and reporting.
Then further customize scheduling and other options.
Enterprise Edition
- Start the SmartBackup application [or Console.exe] (3 minutes)
- Obtain a Smartsheet sysAdmin Token (3 minutes to a few days depending on the availability of your organization's Smartsheet Systems Administrator)
- In the SmartBackup Console, click on "Settings" and expand the "1. General" section. Then use the dropdown to select the appropriate Region for your Smartsheet environment. The options are US (for North America), EU (for European Union), or APJ (for Australia). [Note: contact AcuWorkflow Support if your Smartsheet account uses the GOV region]. IMPORTANT: Remember to click the "SAVE THE SETTINGS" button before moving on to the next step.
- Open the Members panel, enter the sysAdmin Token and click "Save" (0.5 minute)
- Click the "Refresh Now" button to obtain the latest list of all users (2-3 minutes)
- Wait for the green confirmation message in the top right-hand corner of the window, then confirm all users are enabled or disable users that you do not want to include in SmartBackup operations (3 - 10 minutes depending on the number of users to configure). Note that any user with more than 1,000 Sheets will automatically be marked as "Blocked" in the Member list. This is a precaution to alert the SmartBackup Admin to review those users Smartsheet usage to confirm that they indeed are power users. If the user is approved for backups, then the Admin can update them to "Enabled", but you may want to consider assigning those users to their own Queue for processing separately to the rest of the users.
- Go to "Settings" then "LiveCopy" and click on the green "CREATE USER BACKUP VAULTS" button. Wait for the green confirmation message (3-5 minutes)
- Review run time options and click "Save the Settings" to save all changes (10 minutes)
- Refer to the JobCentral Setup section to setup and configure JobCentral as your single source of truth for all SmartBackup notifications and reporting.
Provision Users
A SmartBackup "Member" is a User you want to run SmartBackup functions/jobs for. You only need one Smartsheet SysAdmin API Token to run SmartBackup jobs for all Smartsheet Users in the organization. Once-off or periodically, you can refresh the Member list from Smartsheet to obtain the latest list of Smartsheet Users for your Organization, or you can schedule the RefreshMembers function to run on a regular schedule to ensure that you are always using the latest list of Smartsheet Members when running SmartBackup functions.
Only those Members with a SmartBackup Status of "Enabled", and with a Smartsheet Status of "Active" will be processed.
User provisioning steps:
- Select Members, then paste the sysAdmin token and click SAVE.
- Click on “Refresh Now”, and after a short delay, if the sysAdmin token is correct, then you will see a green "Licensed Users from Smartsheet" success message appear in the top right corner. If there is an error, it typically means that there is an issue with the token.
- The Members list will now display the latest list of Smartsheet Licensed Users together with their SmartBackup Status, and their Smartsheet Status.
- Note that if a User owns more than 1,000 Sheets, when doing a Refresh on initial installation, or after a "New" Install, the SmartBackup Status for those Users will automatically be set to "Blocked", and they will not be included in any SmartBackup operations. In this case, you should review the way those Users are using Smartsheet, and find out why they own so many Sheets, because the total Sheet count may have an impact on your ability to reliably backup your organization's data. If it seems that the User's Smartsheet environment is in order, then you can go ahead and change their SmartBackup Status to "Enabled". Then when the Member list is later Refreshed again, SmartBackup will remember the SmartBackup Status and will not reset it to Blocked.
- To be processed by SmartBackup, each User must have a SmartBackup Status of "Enabled" and a Smartsheet Status of "Active".
- For Business Edition, as described above, first disable all users, then use the edit buttons to Enable up to five registered users. Those should be the same users that were registered with AcuWorkflow.
Provision Backup Vaults
A Backup Vault is the special, auto-generated Workspace within Smartsheet designated as the target online backup area for each Enabled User. This is where LiveCopy will save all online backup copies it creates for each user.
The standard generated name for a provisioned Backup Vault is:
zz!~!-VAULT-do not delete!-:1234567890123456
The number appended designates the unique Smartsheet ID assigned to that User. This UserID will be visible on the Members screen. This UserID field is very helpful when Backup Vault workspaces are shared with SmartBackup Admins, as they will be able to easily identify which shared vault belongs to which user.
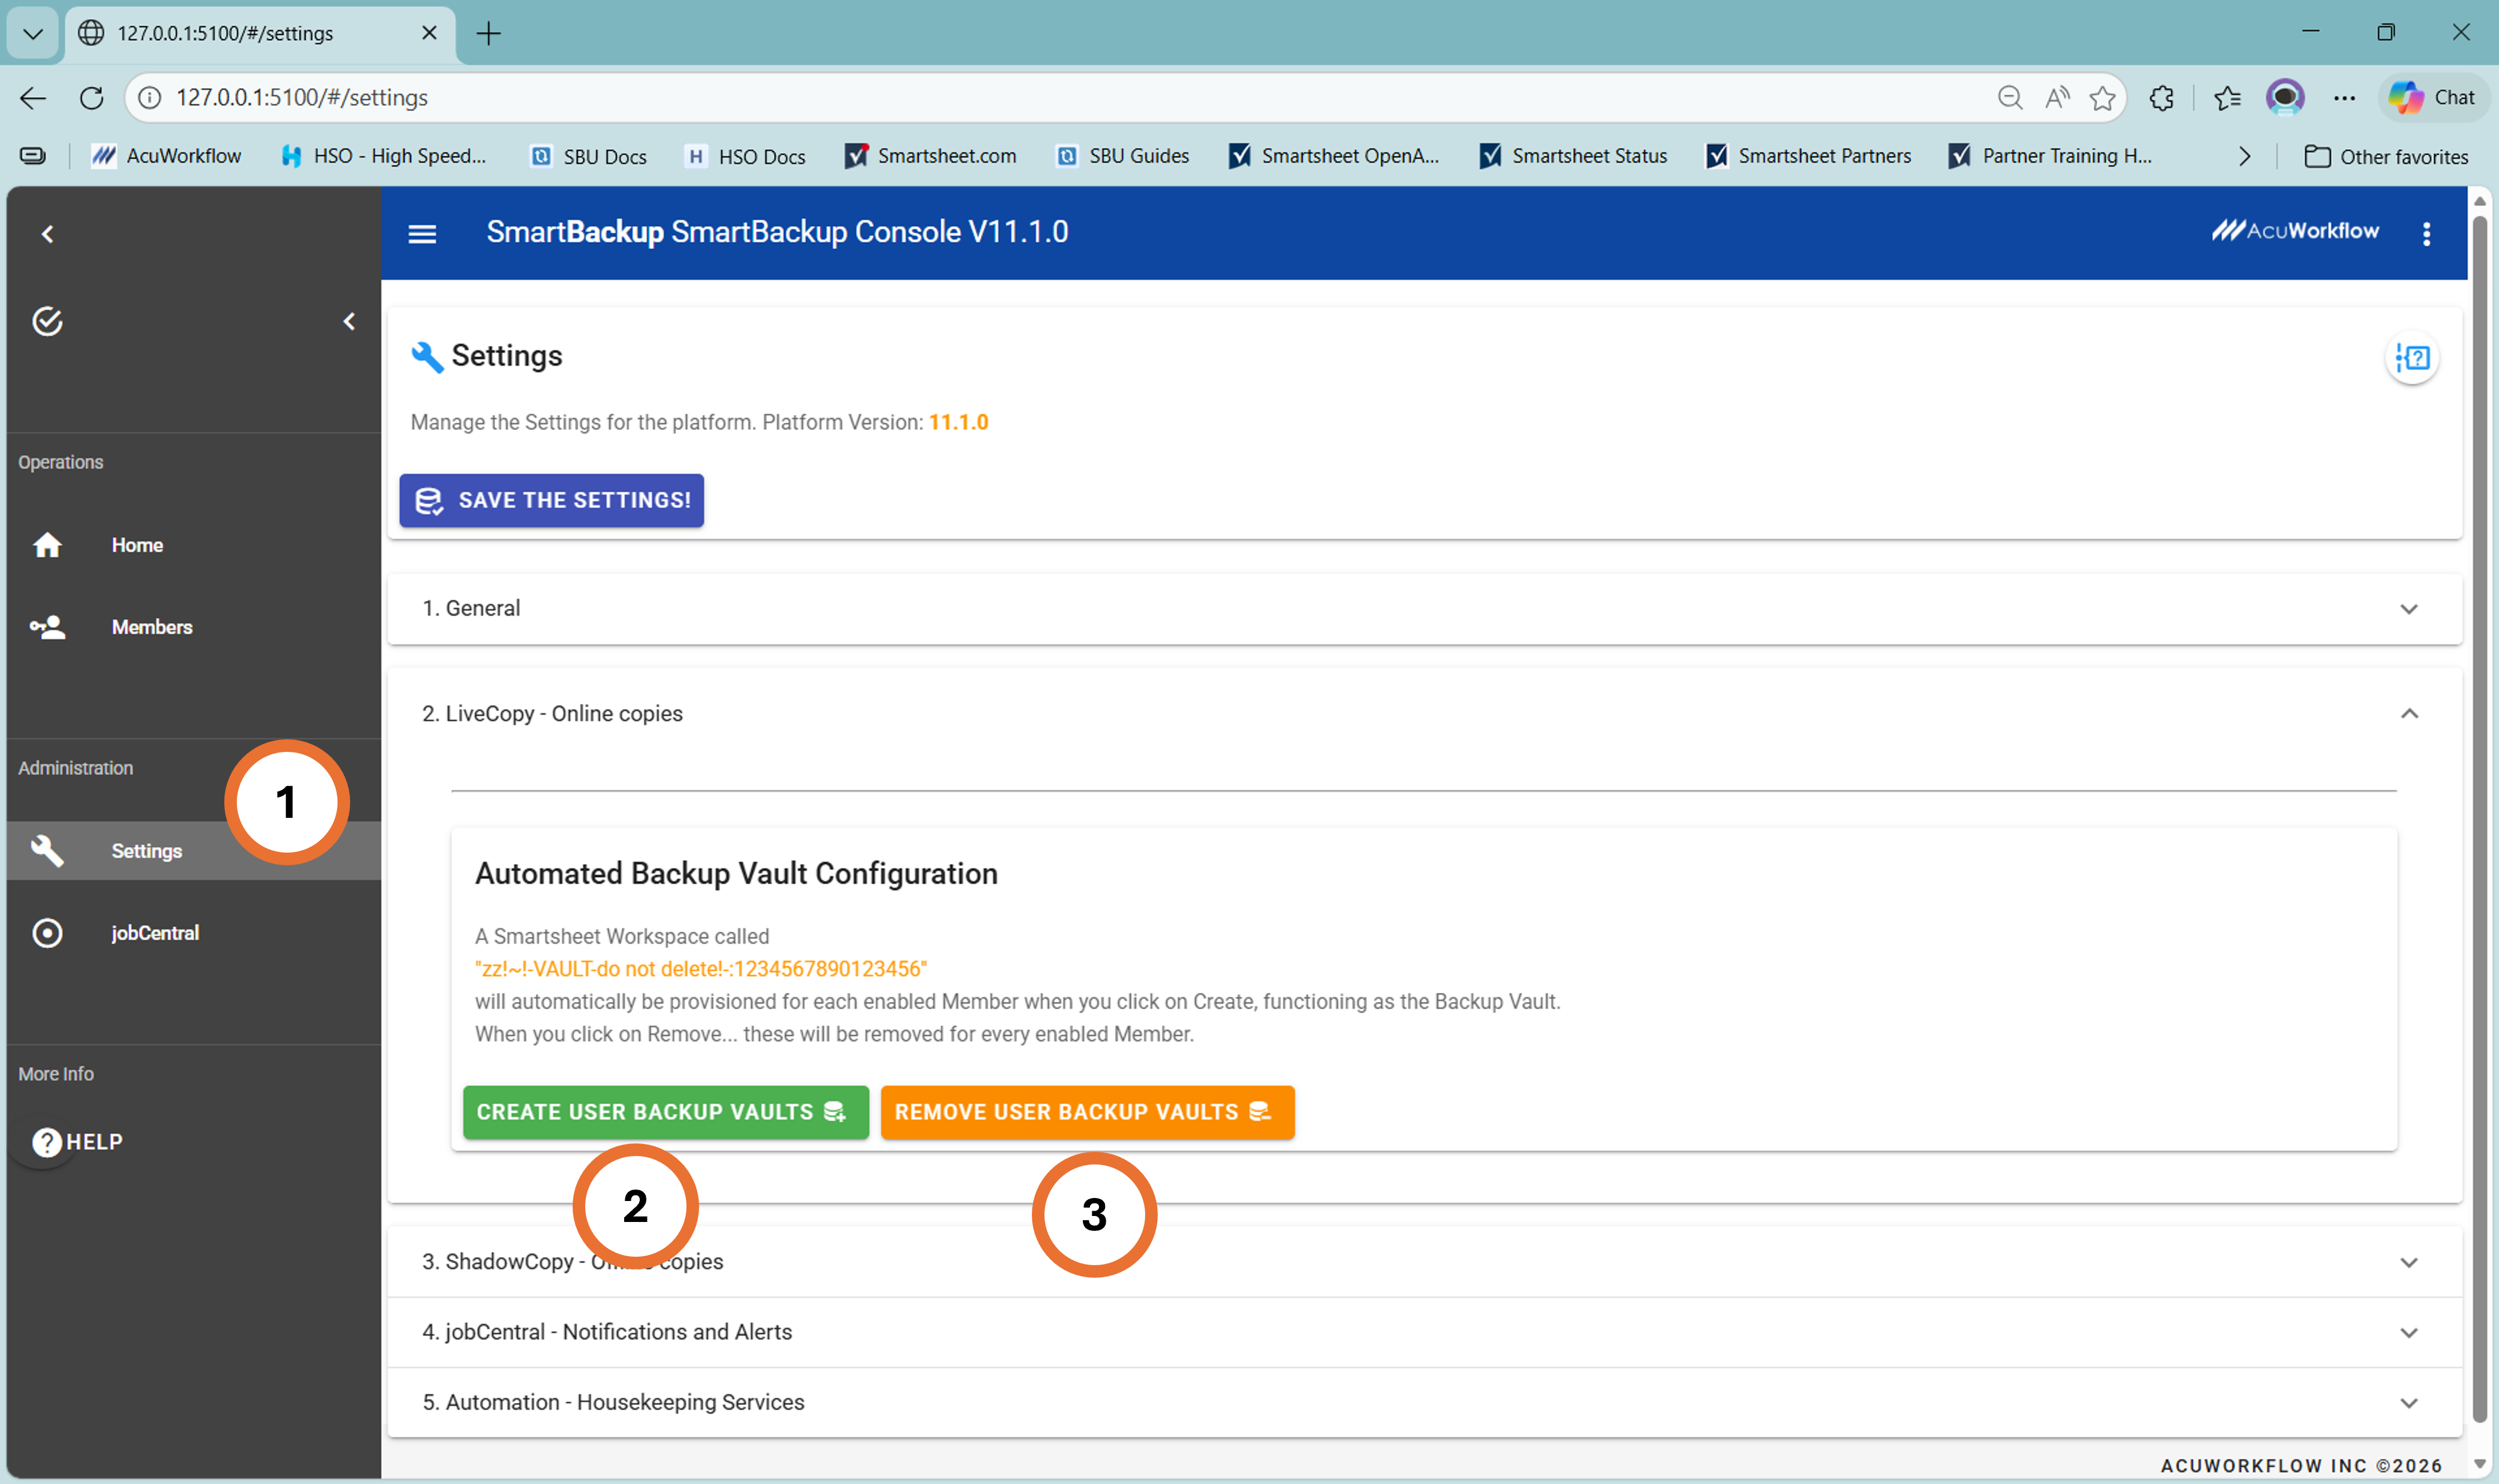
- Click on Settings then Expand the "2. LiveCopy" section.
- Click on “Create User Backup Vaults”, and a Vault workspace will automatically be created for every "Enabled" and "Active" Member in the Member list. A green message will display success.
- Optionally the button "Remove User Backup Vaults" can be used to automatically remove the Vault for every "Enabled" and "Active" Member. A green message will display success.
Provision Users
A SmartBackup "Member" is a User you want to run SmartBackup functions/jobs for. You only need one Smartsheet SysAdmin API Token to run SmartBackup jobs for all Smartsheet Users in the organization. Once-off or periodically, you can refresh the Member list from Smartsheet to obtain the latest list of Smartsheet Users for your Organization, or you can schedule the RefreshMembers function to run on a regular schedule to ensure that you are always using the latest list of Smartsheet Members when running SmartBackup functions.
Only those Members with a SmartBackup Status of "Enabled", and with a Smartsheet Status of "Active" will be processed.
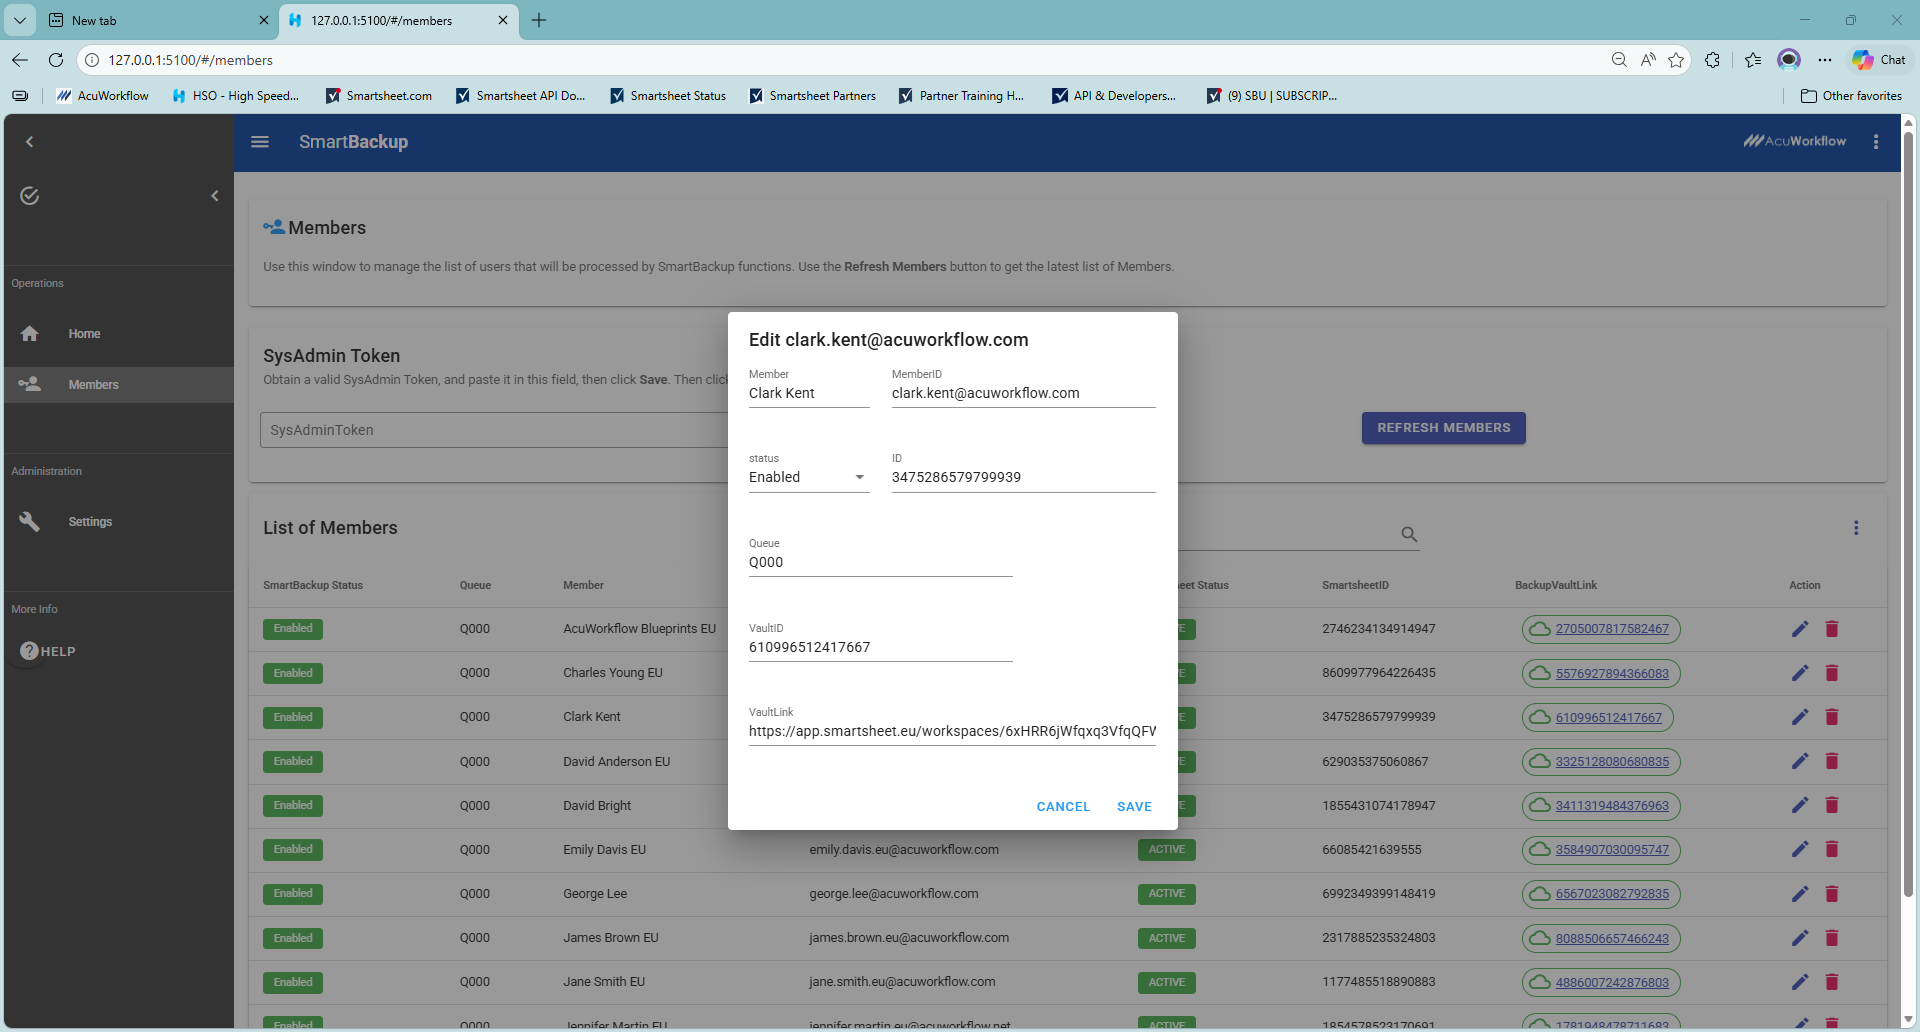
Edit Members
Use the "pencil" icon to the right hand side of each Member to edit the Member's settings. When you click on the edit button, a window will pop-up containing the fields that can be edited. In most cases, the only fields that you will need to edit will be the Status field and the Queue field.
Note that this Status field refers to the Member's SmartBackup Status. The options for the Status field are: Enabled, Disabled, Pending, or Blocked. Of these Pending and Blocked are typically only set by the SmartBackup app.
To help Admins more easily manage the list of Members and the SmartBackup Statuses, we have added a "command menu" which can be accessed in the top right corner of the "List of Members" panel.
Open the Member List command menu to see a list of options, which include: Export to CSV, Mark all DISABLED, Mark all ENABLED, and Create User Vault.
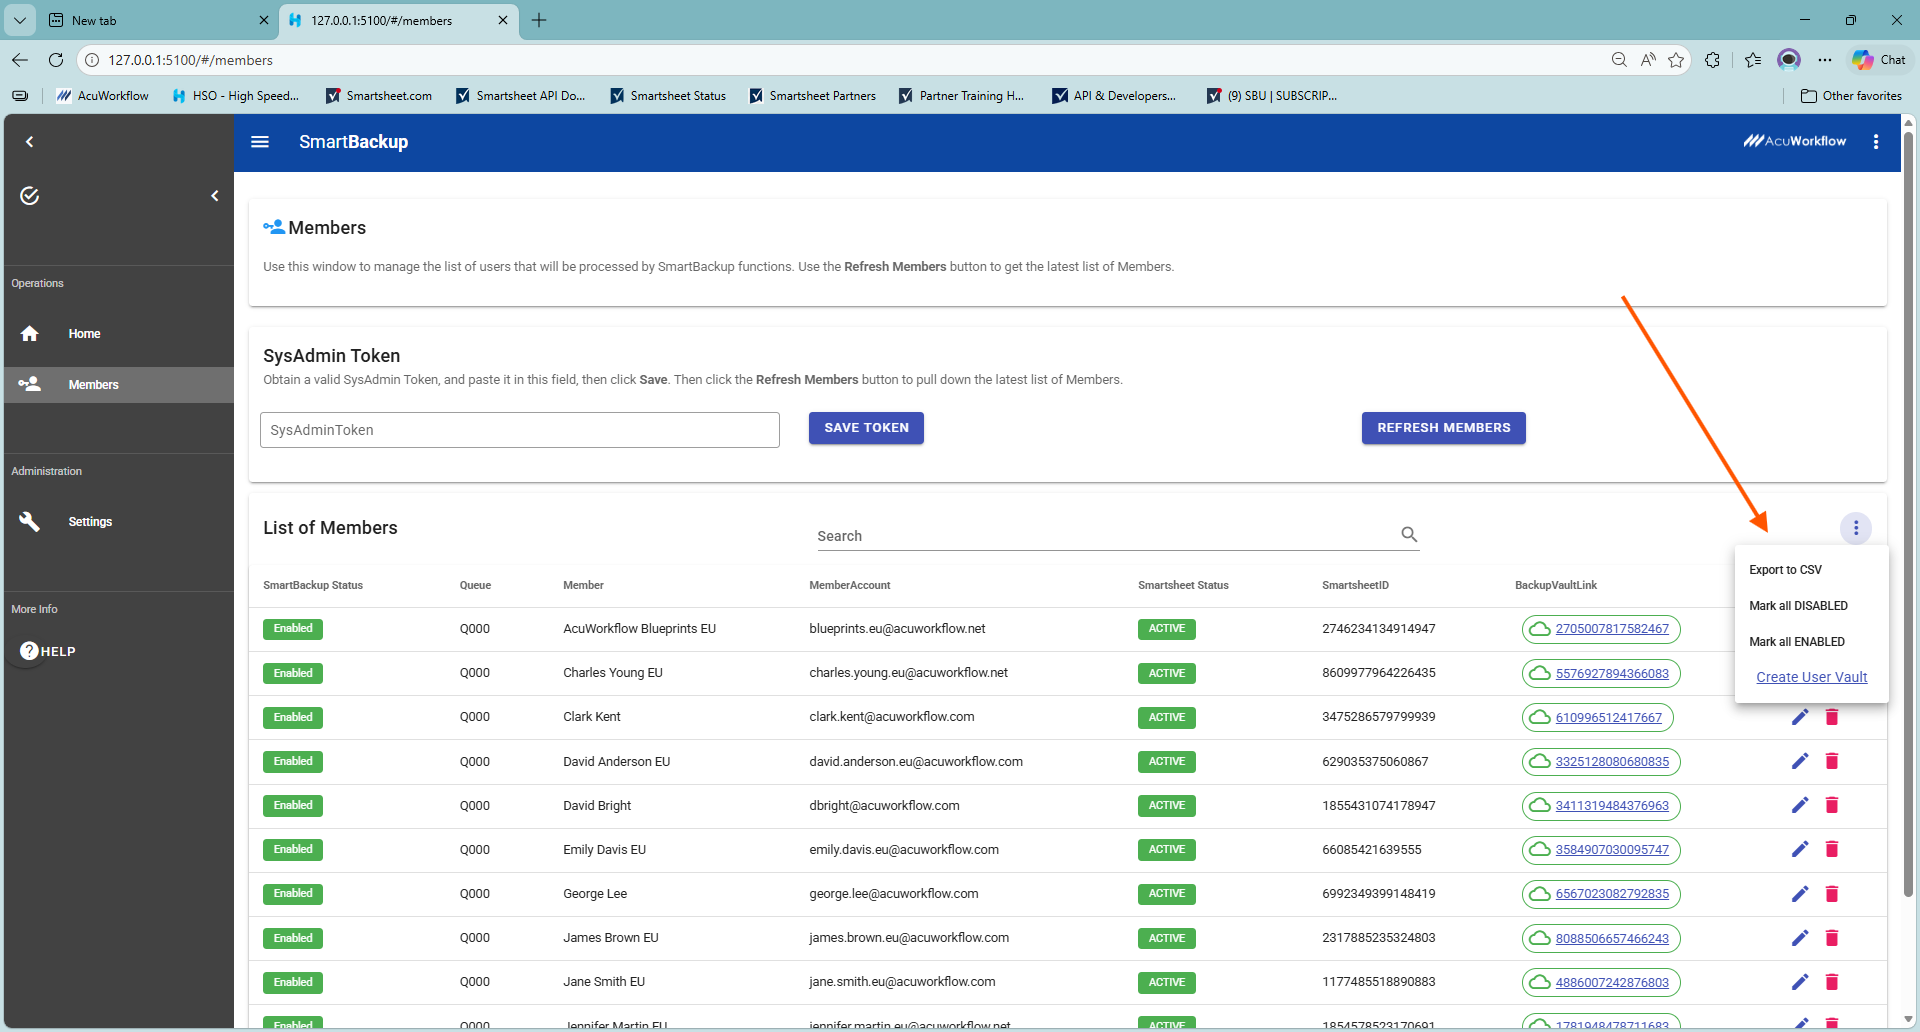
- Export to CSV: This option exports the list of Members and saves it in CSV file to a local drive, for editing and analysis, or for archiving purposes.
- Mark all DISABLED: is used to disable all members, so that you can then enable only selected users. This is typically only used when testing or when debugging.
- Mark all ENABLED: is used to enable all Members once more after your testing or debugging has completed.
- Create User Vault: is a link that takes you to the Settings screen when you can select the LiveCopy section and click the "Create User Backup Vaults" button to create any missing vaults.
Note also that there is a new "Share to Self" feature in Smartsheet which will allow you to click on any Member's backup Vault link and then you can enable Shared access to that Member's Vault without requiring the member's permission or action.
Settings & Platform Configuration
SmartBackup Administrators can configure the Platform further using the optional settings.
In the Settings section of the SmartBackup console, you will find a list of sub-sections, each with various configuration options. Some of these have been discussed above, and in addition, you will find a section for Notification Settings and another section for Housekeeping Services.
In addition to the configuration options in the Settings section, there are several other platform configuration settings that can be customized if needed, but in most cases, are optional.
All of these will be covered below.
Introducing JobCentral
JobCentral is the new, sophisticated job scheduling, managing, monitoring, alerting, and reporting solution for Smartsheet in general, and for SmartBackup in particular.
Once installed and configured, JobCentral, together with your customized RunBooks, will replace the previous limited functionality email notifications process.
The following diagram provides an overview of the JobCentral process. Note that all the key information is saved in Smartsheet. This means that you can use all the great features and capabilities of Smartsheet to customize and enhance your JobCentral setup to meet your specific needs. This includes, Smartsheet sheets, automations, notifications, formulas, reports, and dashboards.
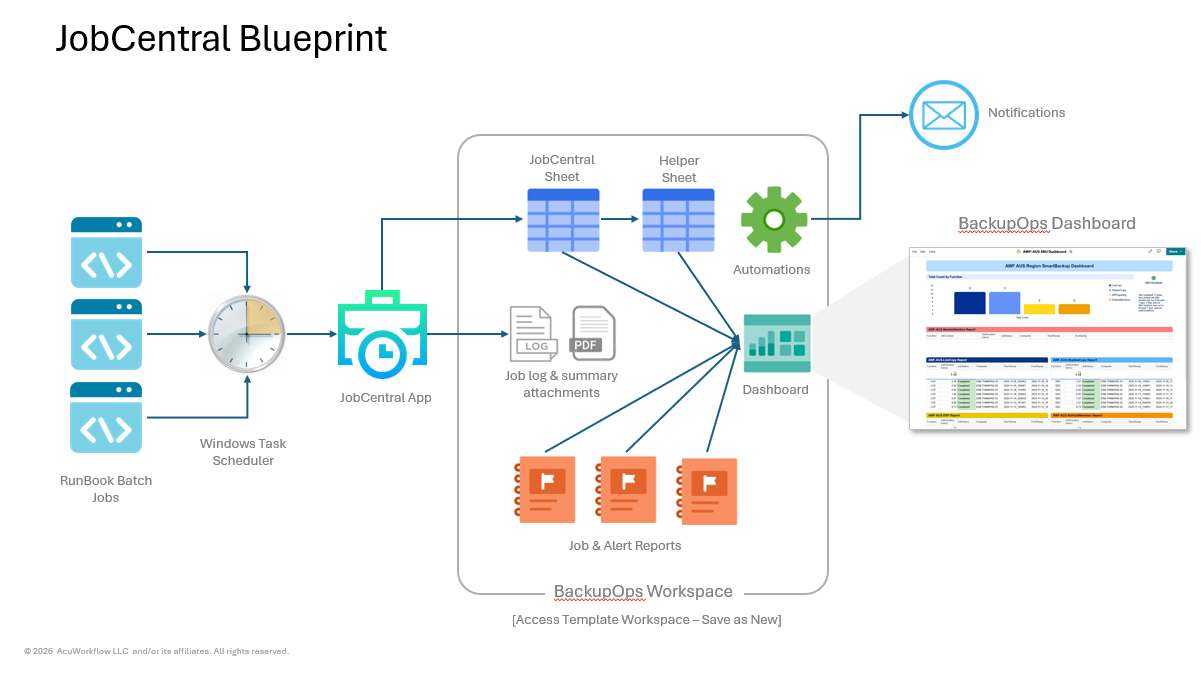
As you can see in the blueprint diagram above, the process starts with a set of RunBooks, one for each SmartBackup function, that you will customize for your specific requirements. Those RunBooks are then scheduled to run using a scheduling tool like Windows Task Scheduler.
Then when each RunBook batch file runs, it will invoke the SmartBackup function, then it will check to see if there was an error or not, and will then invoke the new JobCentral function called jobcentral.exe, which in turn, will gather the associated RunBook data and save it as a new row in your dedicated JobCentral Sheet in your designated Smartsheet account.
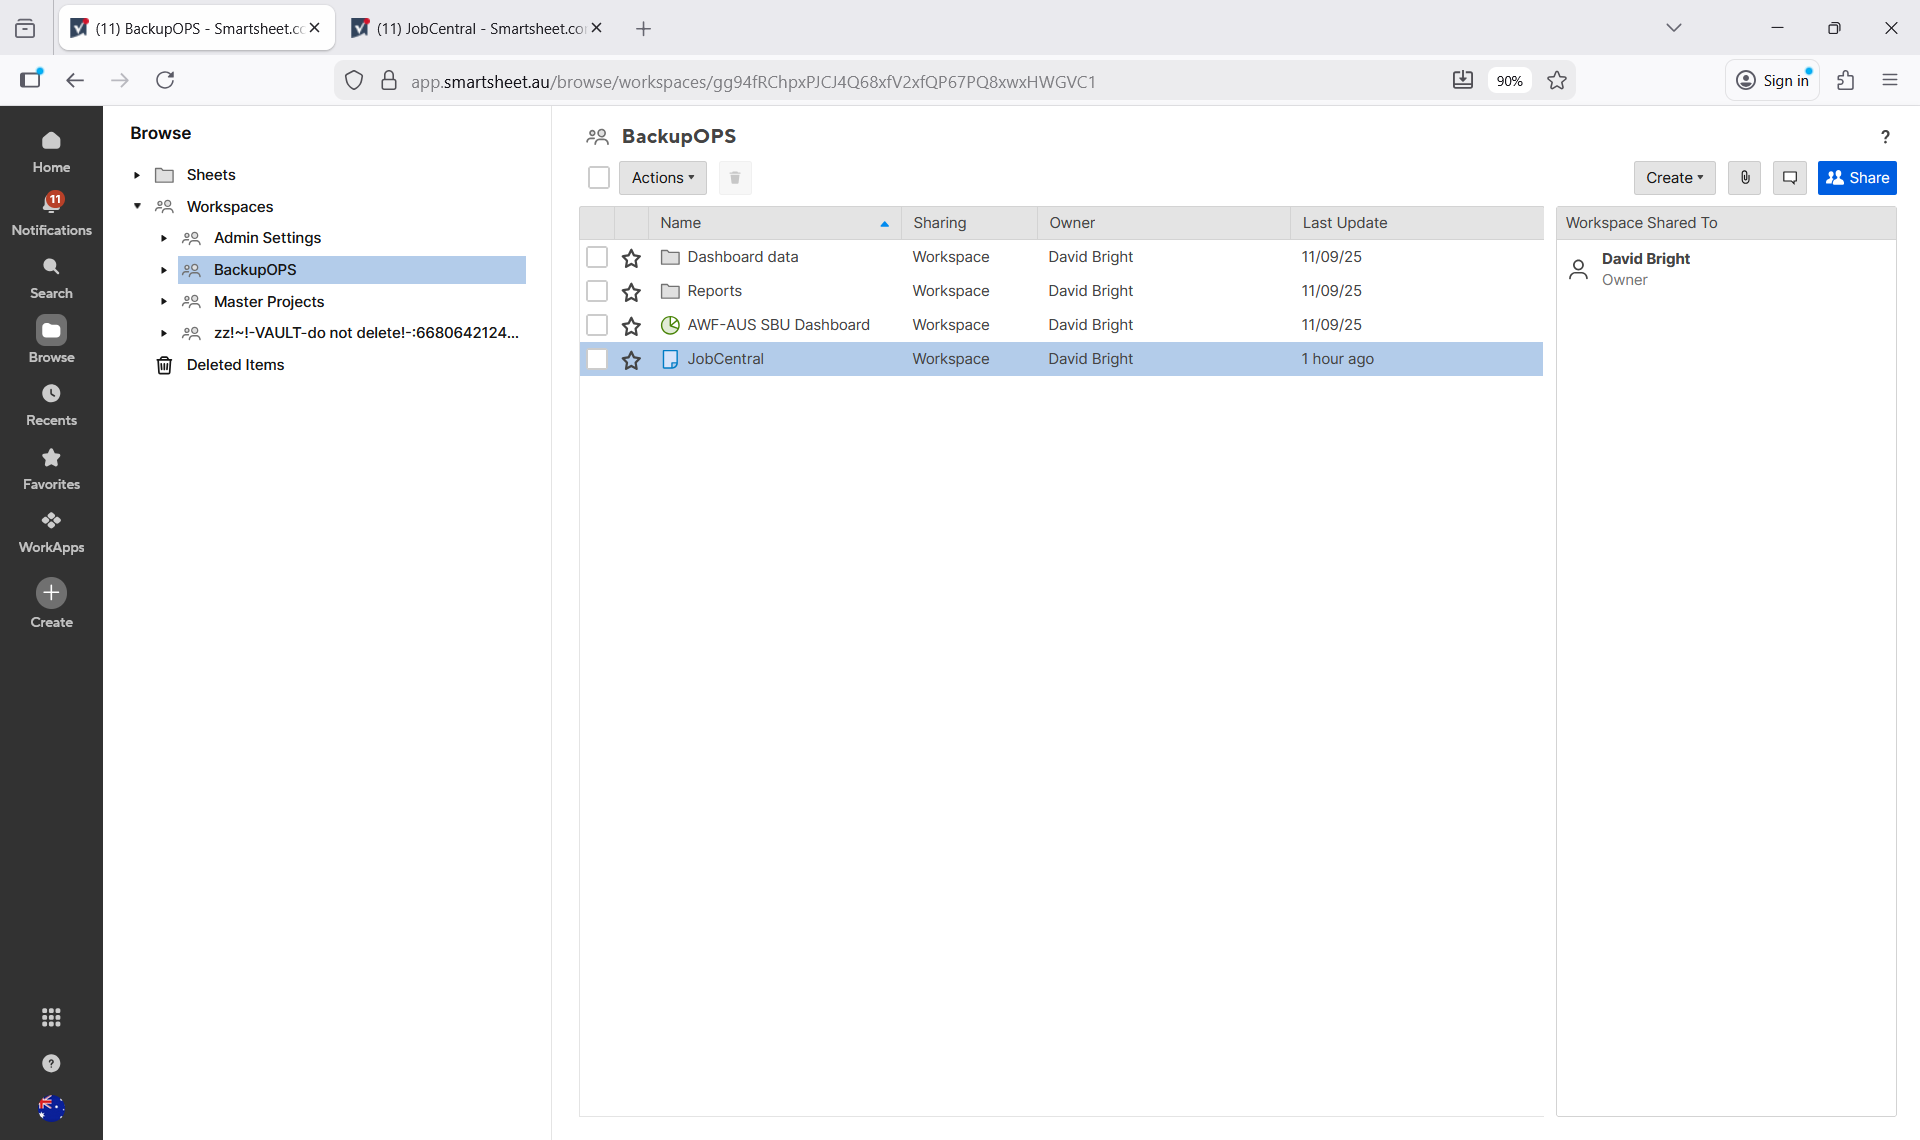
In your BackupOps Workspace in Smartsheet, you will then have the JobCentral Sheet as well as one or more helper sheets, reports, and your JobCentral Dashboard, together with associated automations to drive the notifications as needed.
This means that because all of the SmartBackup job run data is saved in Smartsheet, you as the SmartBackup Admin have full autonomy to customize the solution to meet your organization's needs, and it will be super easy to share SmartBackup dashboards and reporting with team members or executives as needed.
Setting Up JobCentral
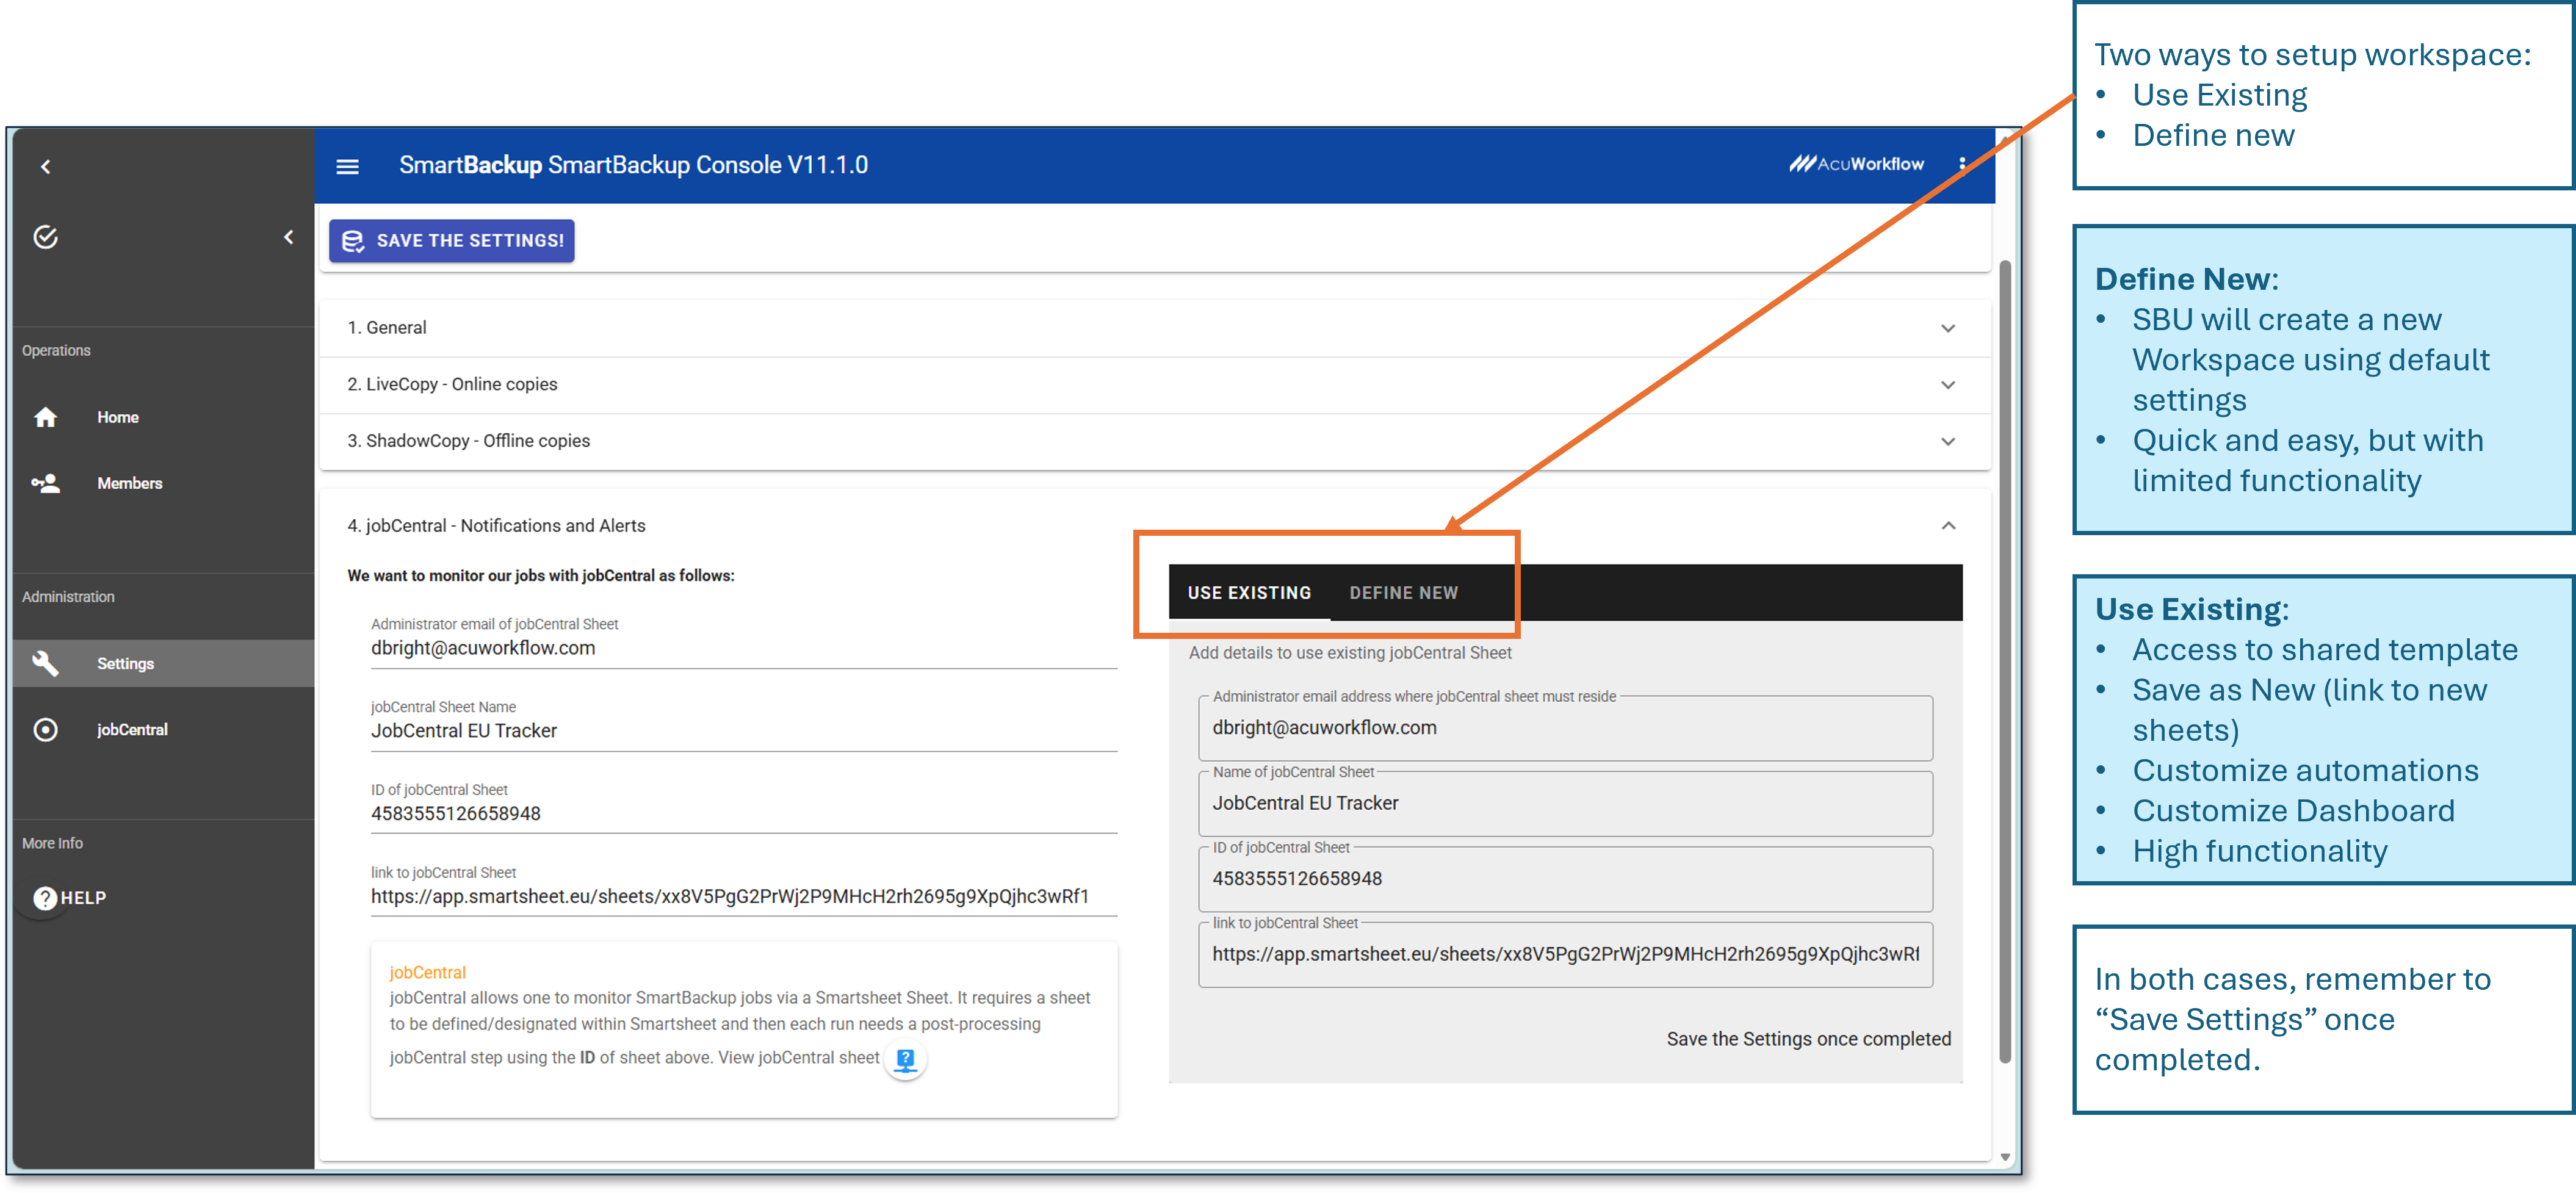
In the Settings section, in the section called "4. jobCentral – Notifications and Alerts " you will find a new section which is used to set up and configure the JobCentral Workspace and Sheet in Smartsheet.
There are three options available for the initial Workspace and Sheet set up:
- Option 1: Simple Version. You can have SmartBackup create a new JobCentral Workspace and Sheet for you. This will consist of a dedicated Workspace and a JobCentral Sheet that will capture the SmartBackup events.
- Option 2: Fully Custom. Use an existing Workspace and Sheet that you have already created. This will allow you full control and customization of the JobCentral environment but will require a deeper understanding of how JobCentral works and will require additional effort.
- Option 3: Copy the JobCentral Blueprint. In this case, you will be able to make a copy of a fully configured and comprehensive JobCentral solution, consisting of a dedicated JobCentral Workspace, containing a tracker sheet, various helper sheets and reports and a configured JobCentral Dashboard with sample data.
In all cases, once the JobCentral Workspace and Sheet have been created, you will have full control over further changes, customization, enhancements etc.
After making any changes, remember to click the "SAVE SETTINGS" button.
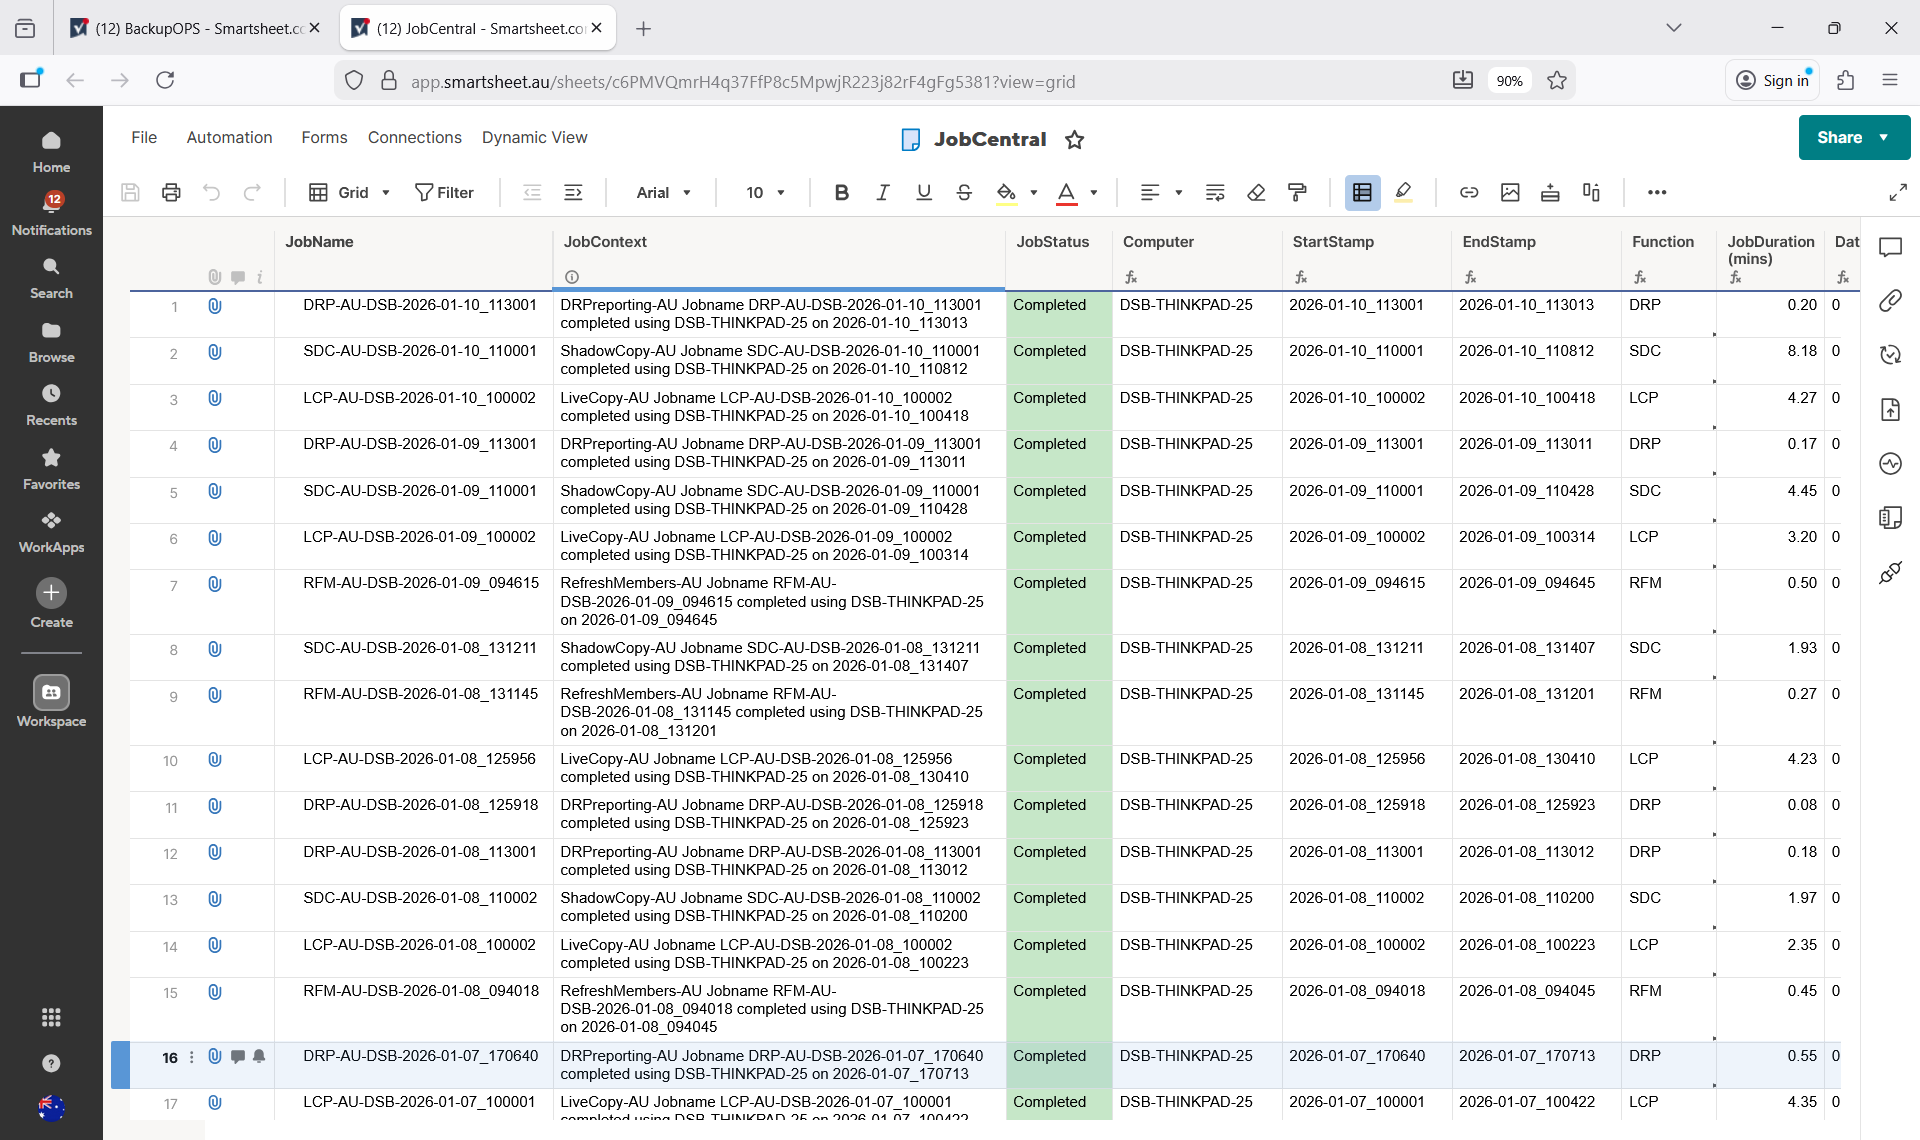
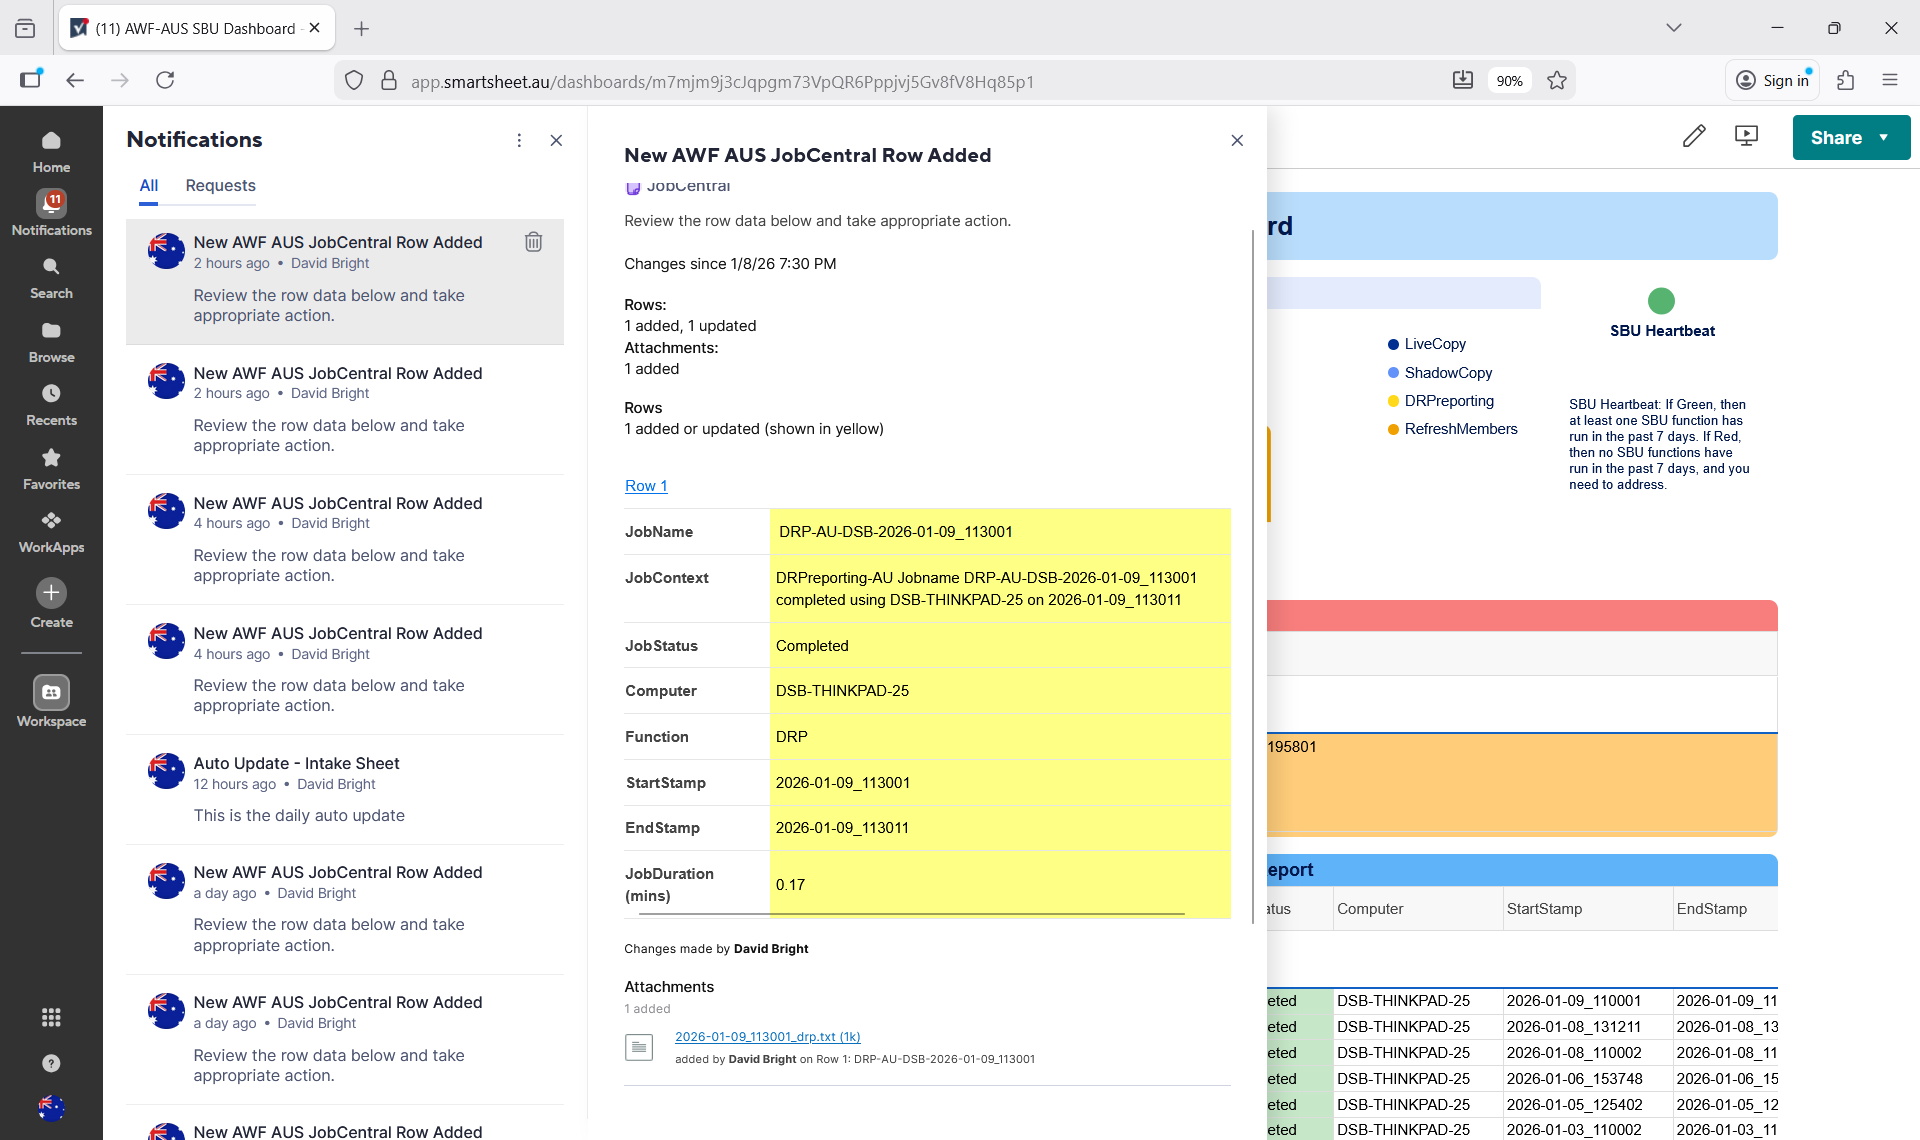
When jobcentral.exe adds rows to the JobCentral sheet, it only adds a few cells for each row. These cells provide the core, basic job-related data together with a couple of customizable fields. These customizable fields can be configured in the associated RunBook batch files, and then those fields can be further expanded in Smartsheet to generate a range of more detailed job data.
For example, you can add extra columns in the JobCentral Sheet and then use column formulas to extract the job function, start and end date/time stamps, job duration, computer name, and so one. All of which can then be included in the notifications, reports and dashboards, as can be seen in the following example.
You can also arrange the assets in your JobCentral or BackupOps Workspace to your liking or needs, and you can add sub folders, etc. as needed, such as the following example:
And then, once you have setup your Reports and Helper Sheets, you can create your JobCentral Dashboard, which may look something like the following example.

And then, because all of the JobCentral data is captured in Smartsheet, you can use Smartsheet automation rules to setup all types of very helpful notifications and easily share those with relevant teams as needed.
Here is an example of what a typical notification may look like in Smartsheet.
Option 1: Simple Version
This is the easiest way to get started with JobCentral, but it also has the fewest number of features to begin with. However, you will have the option to apply additional customization and formatting to suit your needs.
Steps:
- In the SmartBackup Console, go to the Settings page.
- Expand Section “4. jobCentral – Notifications and Alerts”.
- On the right-hand side, click on the “Define New” tab.
- Provide a valid email address for the SmartBackup Admin user account in Smartsheet and confirm or edit the “Name of the workspace” field, and the “Name of the jobCentral Sheet” field.
- Then click “Create New” and then click the “Save the Settings” button at the top.
At this time, the new workspace and jobCentral sheet details will be reflected on the left-hand side of the page.
Now you can log into the user account that was specified in step 4 above and verify that the new jobCentral workspace and sheet have been created.
Now, when ever any of the default “RunBook” files are run, the results will be saved as new rows in the jobCentral sheet.
From this point, you can add automations/notifications to the jobCentral sheet to send you notifications when rows are added, and/or alerts when any job has a status other than “Complete”.
You can also create reports and helper sheets and use those in your reporting, or to drive a dashboard, etc.
Option 2: Fully Custom Version
In this case, you can start with using the “Simple Version” above and the default RunBook files to get an understanding of how it all fits together, and then you can build your own fully custom JobCentral workspace, sheet, reports, dashboard, automations, etc.
Steps:
- Create a new Workspace.
- Create a new Grid Sheet called JobCentral and add at least three columns called: JobName, JobContext, JobStatus.
- Open Smartbackup Console and navigate to the Settings page, and to the section called “4. jobCentral – Notifications and Alerts”.
- Select the “Use Existing” tab on the right-hand side and enter the details of your new JobCentral sheet.
- Remember to click “Save the Settings”.
At this time, you can use the default RunBook files to run LiveCopy and ShadowCopy, and you can also start customizing the RunBooks and the JobCentral sheet and workspace assets to meet your needs.
Option 3: Copy the JobCentral Blueprint
To help our customers accelerate the JobCentral setup and configuration process, we have created a workspace blueprint containing all the required sheets, reports, dashboards, and automations to get started.
In this short video, we explain how to make a copy of the JobCentral Blueprint workspace in Smartsheet.
If you follow the steps in this video, then you will have a complete, working set of assets in Smartsheet for your JobCentral solution, and you can capture the sheet details in your SmartBackup console.
AcuWorkflow JobCentral Blueprint Request Form
Click the button to request access to the JobCentral Blueprint template workspace for your region.
RunBook Examples
As mentioned in the video above, you can also download a set of example RunBooks, which are designed to work together with the JobCentral Blueprint Workspace.
You can download the RunBook Examples here.
Housekeeping Services
With SmartBackup R11, we introduced a new internal scheduling engine, which is aimed at helping to streamline the overall operation and setup of SmartBackup. These capabilities will be further enhanced over time.
In this initial release, Housekeeping Services provide a way for SmartBackup Admins to easily schedule key SmartBackup functions to run automatically, without having to configure and use Windows Task Scheduler.
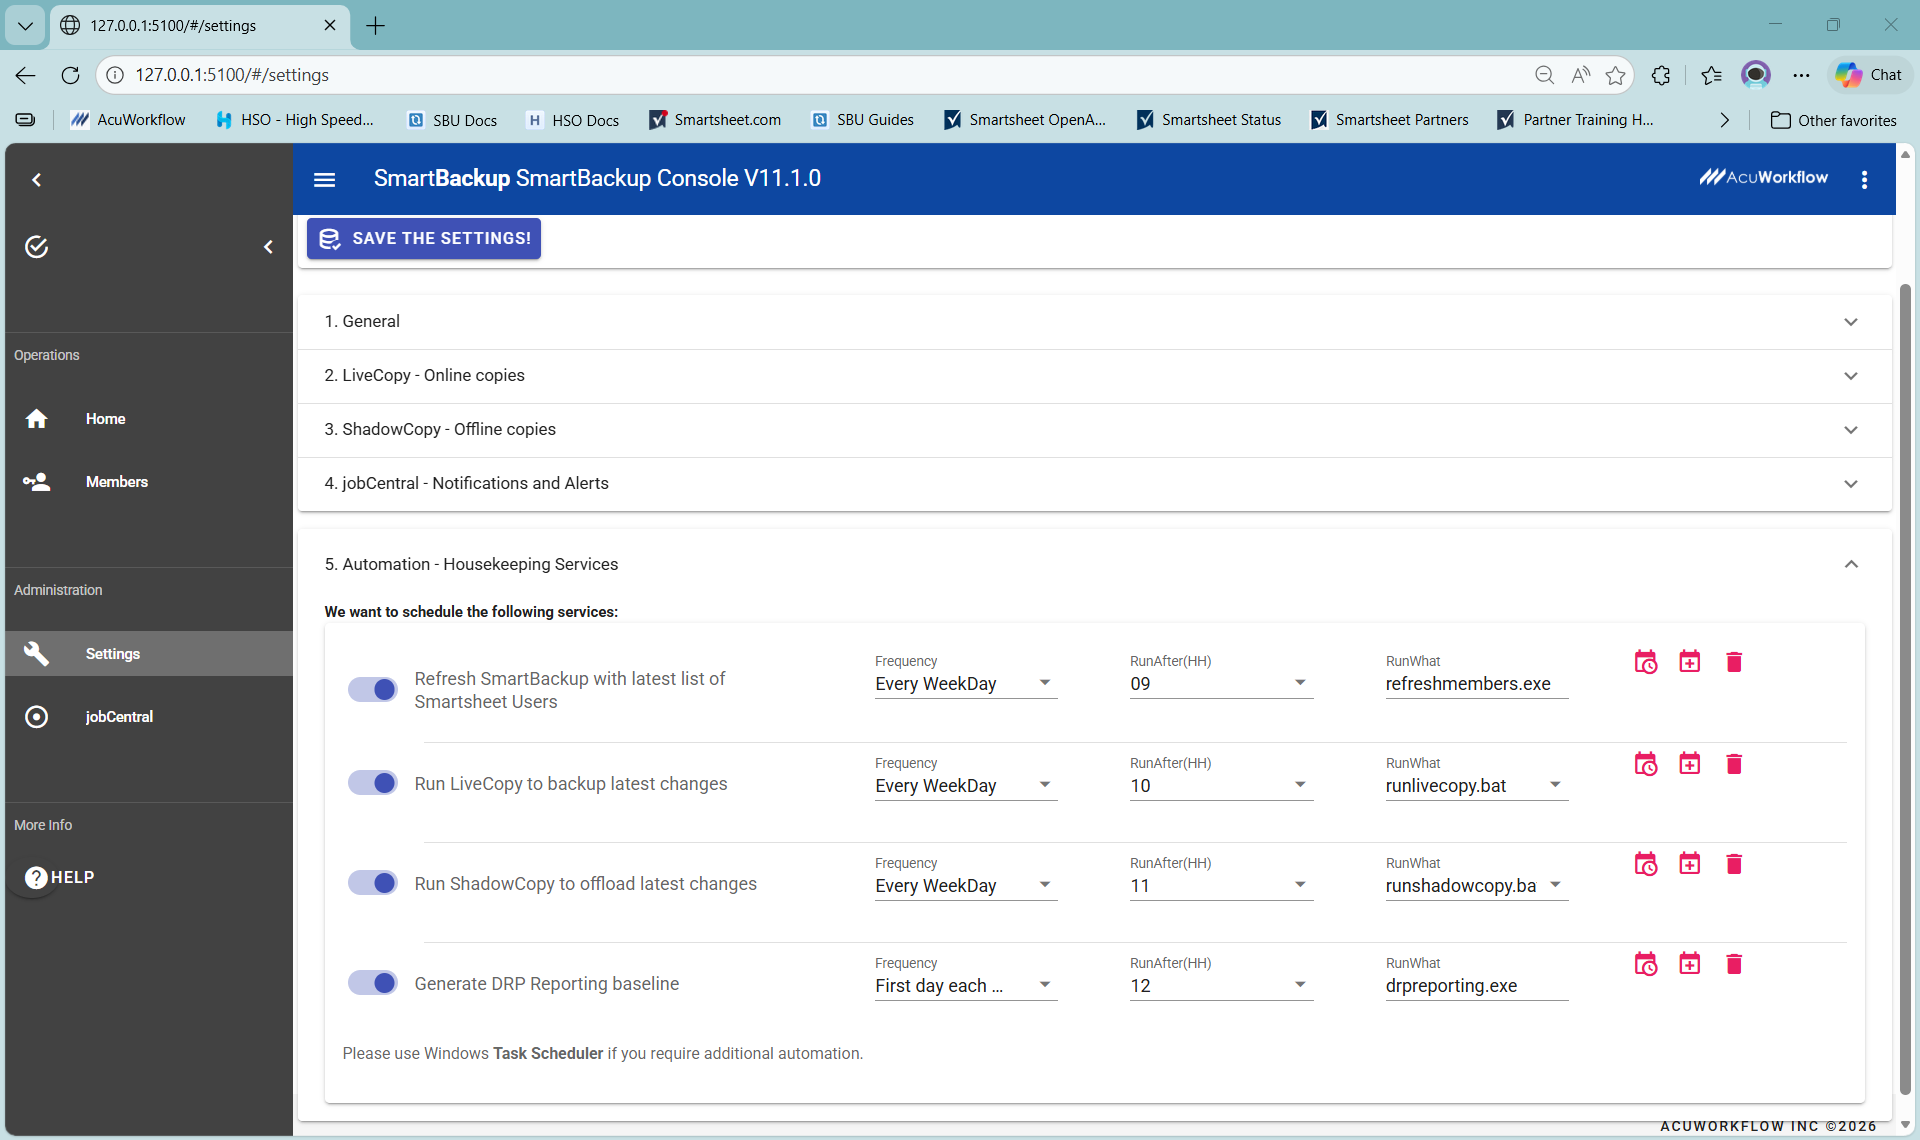
When you navigate to Settings and expand the section called "6. Housekeeping Services", you will see a list of the key SmartBackup functions, including Refresh Members, LiveCopy, ShadowCopy, and DRP Reporting. Then for each function you have the option to enable or disable Housekeeping services.
For each service, you can then select the required Frequency and the Start time - and then you can also specify the function to run. defaults are provided, but you have the option to customize to your needs.
Once a function has been enabled, click on the "Add new scheduled service" icon - which is the middle calendar icon with a plus sign. You will then see a green confirmation message in the top right corner of the console window.
Then you can click on the "Show next run" icon - which is the left calendar icon, and that will show the next scheduled runtime for that function.
You can also use the "remove scheduled service" icon - which is the "trash" icon on the right, to remove a previously scheduled time.
When configured and enabled, these housekeeping functions will run automatically - as long as the SmartBackup Console is open.
That concludes the Administration settings available in the SmartBackup Console.
Once all aspects have been configured, and all tasks are automated, it should not be necessary to use the SmartBackup console, other than for regular maintenance and admin tasks.